Home Insteading With Cooperative Extension (Week 59)
go.ncsu.edu/readext?796280
en Español / em Português
El inglés es el idioma de control de esta página. En la medida en que haya algún conflicto entre la traducción al inglés y la traducción, el inglés prevalece.
Al hacer clic en el enlace de traducción se activa un servicio de traducción gratuito para convertir la página al español. Al igual que con cualquier traducción por Internet, la conversión no es sensible al contexto y puede que no traduzca el texto en su significado original. NC State Extension no garantiza la exactitud del texto traducido. Por favor, tenga en cuenta que algunas aplicaciones y/o servicios pueden no funcionar como se espera cuando se traducen.
Português
Inglês é o idioma de controle desta página. Na medida que haja algum conflito entre o texto original em Inglês e a tradução, o Inglês prevalece.
Ao clicar no link de tradução, um serviço gratuito de tradução será ativado para converter a página para o Português. Como em qualquer tradução pela internet, a conversão não é sensivel ao contexto e pode não ocorrer a tradução para o significado orginal. O serviço de Extensão da Carolina do Norte (NC State Extension) não garante a exatidão do texto traduzido. Por favor, observe que algumas funções ou serviços podem não funcionar como esperado após a tradução.
English
English is the controlling language of this page. To the extent there is any conflict between the English text and the translation, English controls.
Clicking on the translation link activates a free translation service to convert the page to Spanish. As with any Internet translation, the conversion is not context-sensitive and may not translate the text to its original meaning. NC State Extension does not guarantee the accuracy of the translated text. Please note that some applications and/or services may not function as expected when translated.
Collapse ▲Zombie Trees
Katy Shook, Area Horticulture Agent
There’s a new term in the landscape – Zombie Trees. Zombie Trees are trees that are showing signs of life, but, upon further inspection, more closely resemble the walking dead. What’s causing the apocalypse? For several years, arborists have warned about the potential impact of frequent, extreme weather events on mature trees. Older trees, although hardened by time, are less likely to recover from heavy fluctuations in rain, temperature, and wind.
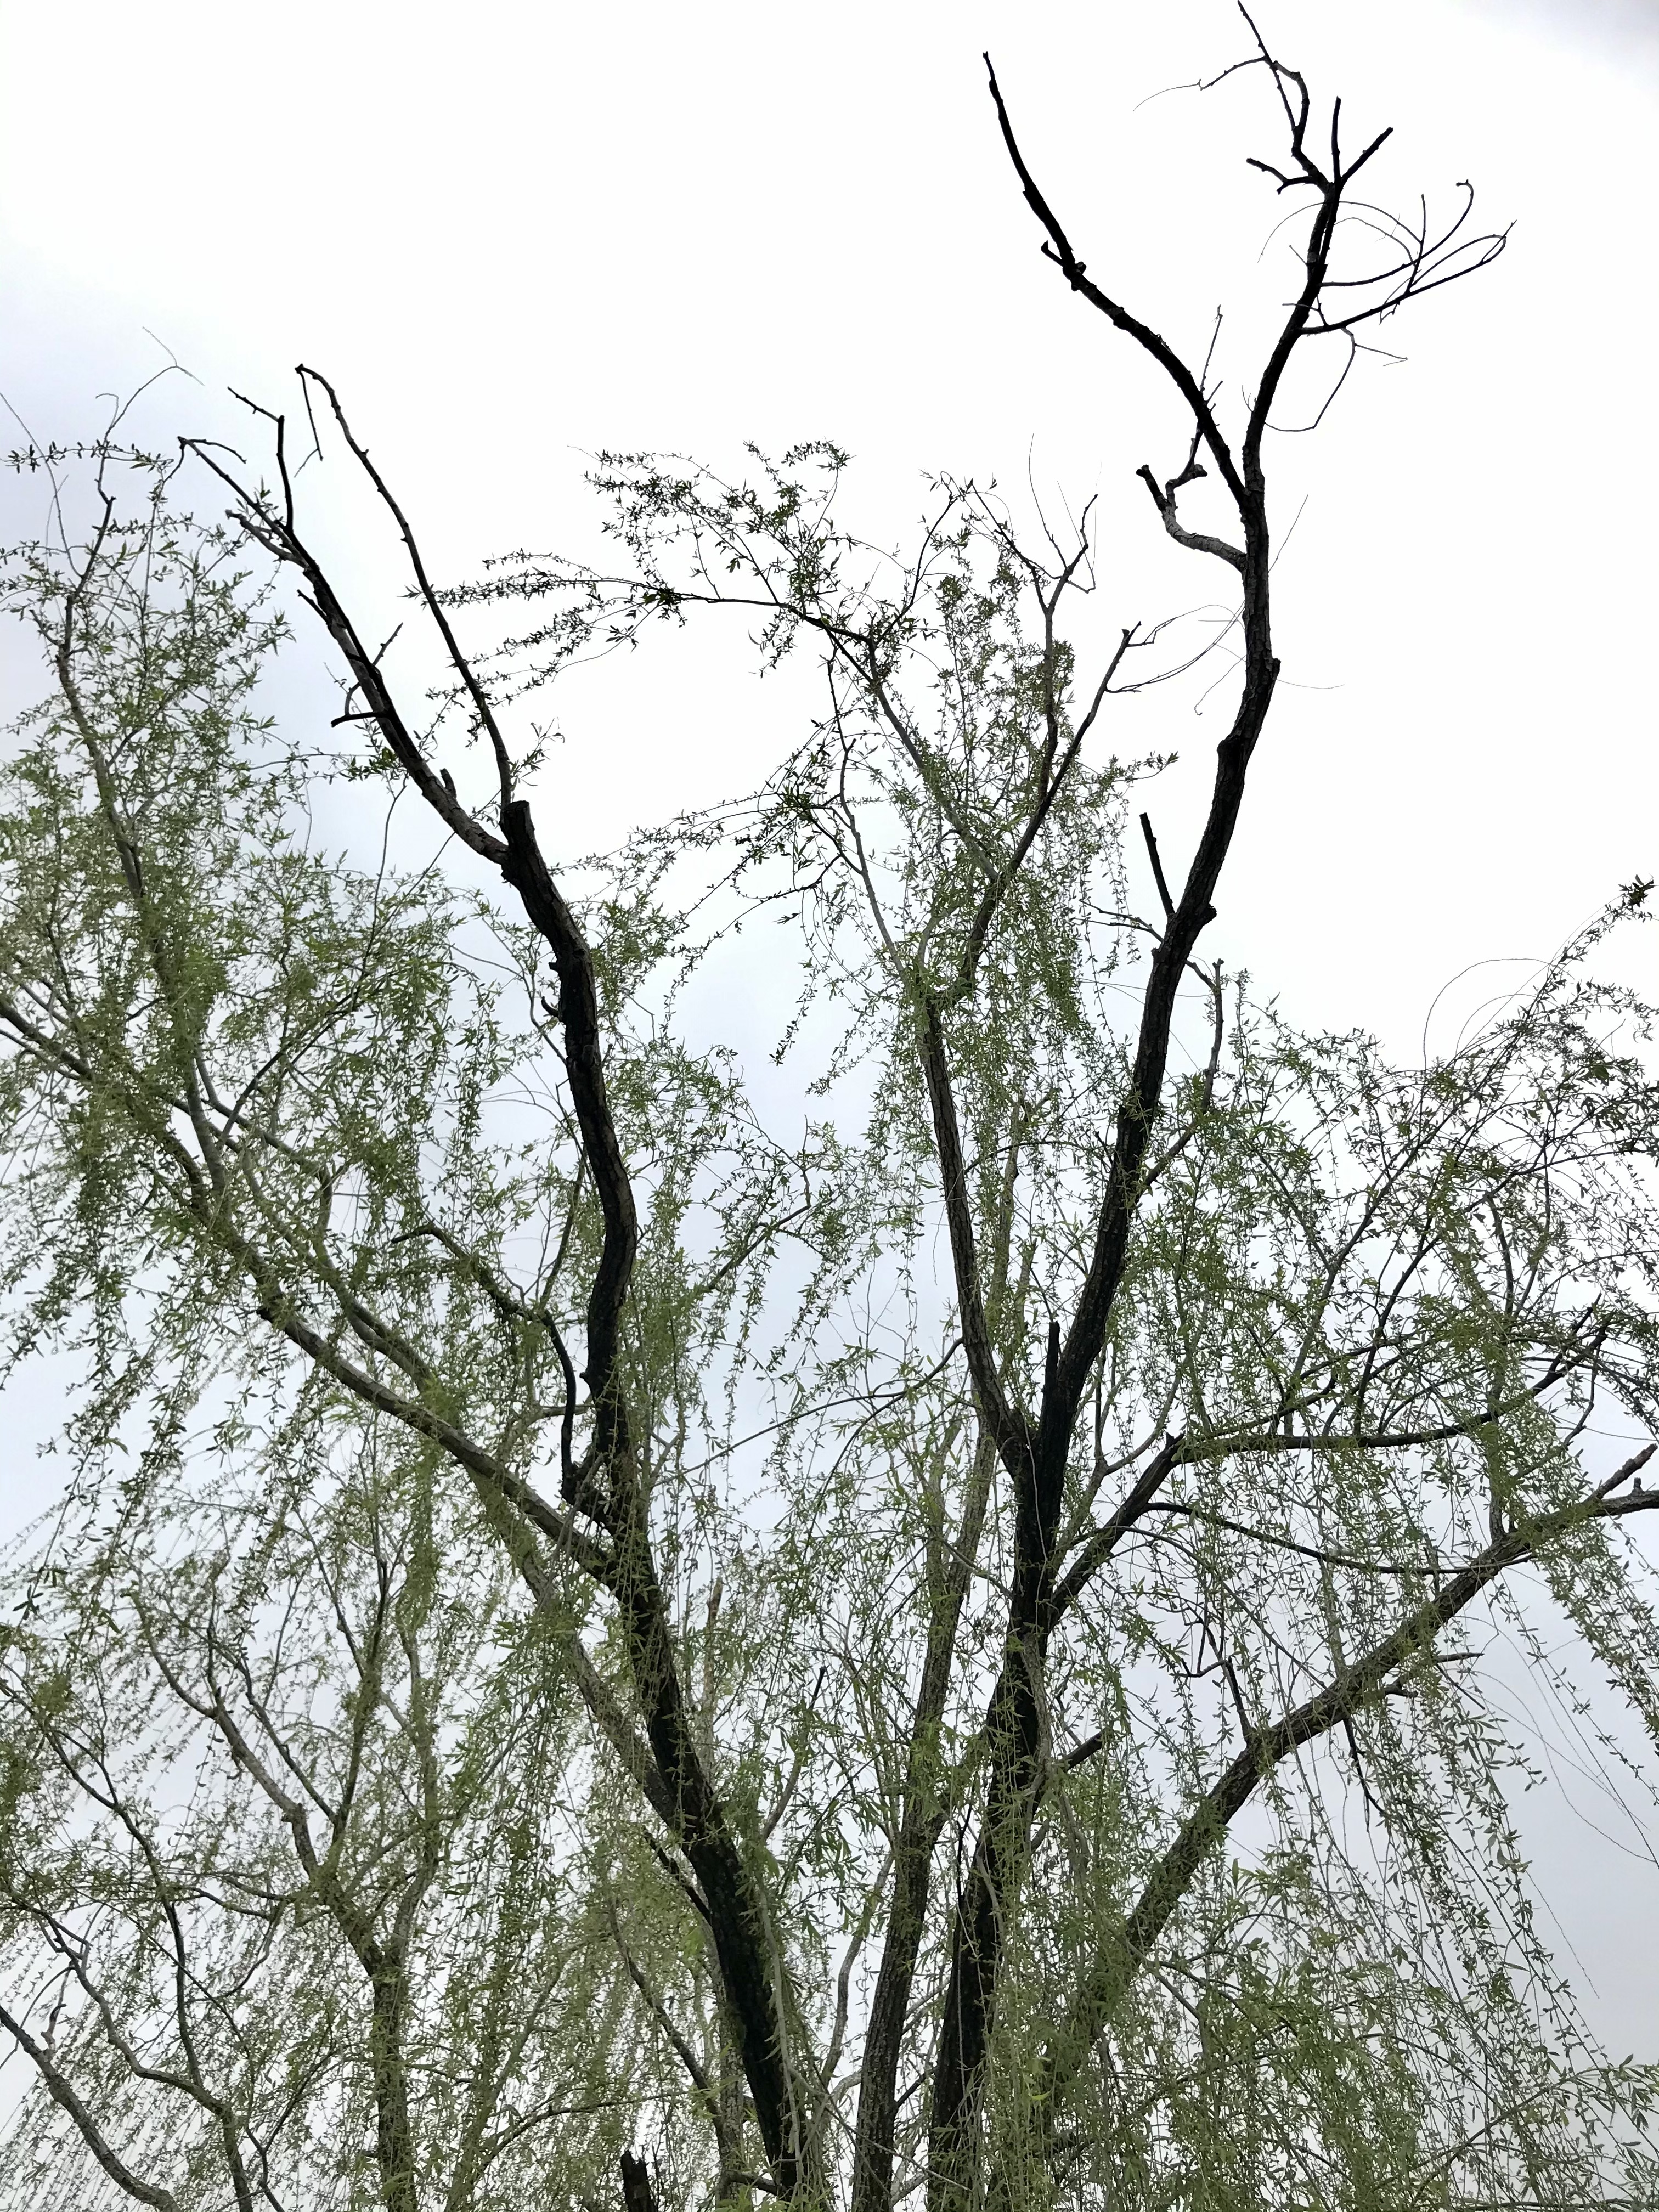
How do you spot a zombie tree? Look for decline in the crown. The crown is the above-ground growing portion of a tree. Decline in the growing tips can indicate damage to the roots, trunk, and overall health. This damage is different from insect and disease damage which is usually splotchy and affects different parts of the tree.
If you notice that a tree is more than 25% in decline, start thinking about long term health and management. Take pictures of the tree; this will help with annual assessments and potential insurance claims. Dead, standing trees (also known as snags) are beneficial to wildlife, but can be hazardous to humans. There are no chemicals, fertilizers, or other inputs that will improve the long term health.
Tree risk is best assessed by a certified arborist. Find a certified arborist through the International Society of Arboriculture.

How to spot a zombie tree: Look for decline in the growing tips.
Freezing Vegetables
Submitted by: Camaryn Byrum, 4-H Agent
Always select the best and freshest vegetables for any method of food preservation. If possible, harvest the morning of freezing or the evening before when it was cool. Prepare vegetables quickly to avoid loss of quality, or store them in the refrigerator if there is going to be a delay. Wash; sort under cool, running water; peel; trim; pit; or cut into pieces as directed or needed.
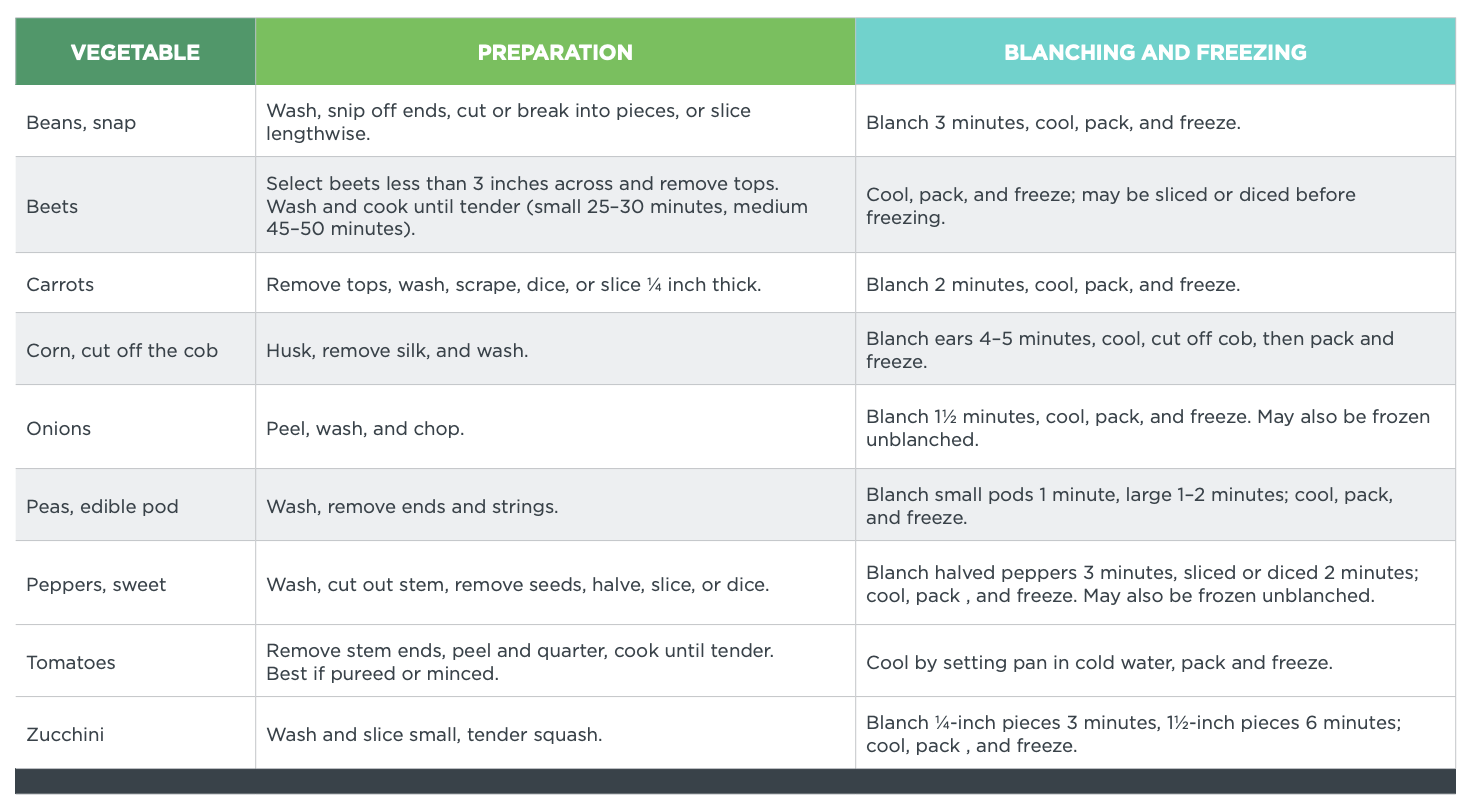
Prepare vegetables for freezing by blanching. Blanching is the process of immersing food in boiling water for a short period of time, then cooling it quickly to stop cooking. This short heat treatment stops the enzymes that can cause undesirable changes in the food after it is frozen. Without proper blanching, most vegetables will lose nutritive value and undergo changes in color, flavor, and texture.
Follow these guidelines:
- Put water in a large saucepan with a tight lid and bring to boil.
- Allow 1 gallon of water for each pound of vegetables, except leafy greens, which require 2 gallons per pound.
- Place a small quantity of vegetables in a basket or strainer and immerse in boiling water.
- Cover the saucepan and boil for the length of time required. Begin timing as soon as the vegetables are placed in the water.
- Lift vegetables out of the water and cool immediately under cold, running water or in ice water. Cool for about the same length of time as blanching.
- When cool, drain, pack into containers, and freeze.

What is Kombucha? And How to Make Your Own
Submitted by: Mary Morris, Family and Consumer Sciences Agent
Written by: Colorado Farm to Table Food Safety
If you have noticed Kombucha (kom-BOO-cha) on the shelves lately here is some information on what this beverage is and the health benefits.
Kombucha is a lightly effervescent, cider-like beverage, made by fermenting sweetened tea. It is produced using a starter culture of bacteria and yeasts called a SCOBY (Symbiotic Colony of Bacteria and Yeast). A mature SCOBY resembles a flat, jelly-like pancake, often referred to as a ‘mushroom’ or ‘tea fungus’ due its unique appearance, although it is not a mushroom.
Nutrition and health benefits – Kombucha contains live beneficial bacteria and yeasts, organic acids, B vitamins, antioxidants, and trace minerals. Added juice or flavorings may contribute nutrients as well. With only about 30 calories and 2-3 grams of sugar per 8 ounces of unflavored kombucha, kombucha can be a refreshing, low calorie beverage.
Health impacts attributed to kombucha vary widely, from claims of multiple therapeutic effects, such as improved digestion, gut health, and immune function, to adverse reactions if acid levels become unusually high. Only limited scientific research is available to help answer questions about the benefits and safety of kombucha.
How is kombucha made? Maintain safe and hygienic practices, such as following proper steps and keeping a clean environment, to minimize risk of contaminants such as molds or harmful bacteria which could cause illness. Always wash hands well and rinse with kombucha or vinegar before handling the SCOBY. First, obtain a SCOBY and starter liquid, either from a friend’s mature starter or purchased fresh online. The SCOBY and liquid are added to a food-grade vessel of brewed, cooled, sugar sweetened tea, then lightly covered and allowed to ferment at room temperature, typically for 7-10 days but possibly up to one month. The liquid acidifies the tea to assure a safe pH level and minimize contamination, while the sugar feeds the bacteria and yeast, producing an acidic end product which tastes a bit like cider vinegar, typically with slight carbonation and trace amounts of alcohol. Fruit juice or other flavorings may then be added as desired.
Precautions – When consuming any new food or beverage, start small (up to 4 ounces per day with plenty of water) and observe your own body’s results. Under some conditions, the alcohol level may exceed 0.5 percent alcohol by volume, which surpasses the limit for non-alcoholic beverages. If any signs of spoilage are noted, such as fuzzy blue, gray, green, brown, or black mold, discard the SCOBY and kombucha, and thoroughly wash vessel.
Making Kombucha
Ingredients for 1 gallon:
¼ cup green and/or black tea (in mesh bag), or 4-8 tea bags
1 gallon of filtered water
1 cup cane sugar 1-2 cups Kombucha Starter Liquid (from a previous batch)
1 SCOBY (I ordered from Amazon)
Equipment:
- Tea kettle or pot, for heating water
- Brewing vessel, safe for fermenting (i.e. large glass jar, stainless steel, food grade plastic)
- Clean fine weave cloth, towel, or coffee filter (large enough to cover brew vessel)
- Rubber band (wide enough to fit around brew vessel)
- Bottles or jars, for finished kombucha
- Funnel (optional)
Instructions:
- Heat water. In brewing vessel, make tea. Steep tea for 10 minutes.
- Remove tea leaves or bags. While water is still hot, stir in sugar and completely dissolve.
- Allow sweetened tea to completely cool to room temperature. ** ** Alternative method to cool faster: heat only half the water in step #1, to make a strong sweet tea, then add the remaining water as cold water.
- Once cooled to room temperature, with washed hands, add SCOBY and Kombucha Starter Liquid to sweetened tea.
- Cover with clean cloth or coffee filter. Secure with a rubber band or bungee cord to keep insects and contaminants out but allow air flow. Record start date.
- Allow kombucha to ferment at room temperature (ideally 64-79°F/18-26°C) for 7-14 days. A new SCOBY will develop on the surface of the liquid, starting as a light haze that gradually turns whitish, then opaque and thicker as time progresses. Check the kombucha flavor after a week. Stop fermenting when you like the flavor.
- To “stop” fermenting: pour kombucha into clean jars or bottles sanitized by rinsing with boiling water or vinegar, retaining SCOBY and at least 1-2 cups for your next batch. Save more, at least 20%, if following continuous brew technique (see below).
- Flavor finished kombucha as desired with 10-20% juice or clean fruit, and experiment with clean herbs and spices based on preference. Cap tightly. Leave at room temperature 1-3 days for potential carbonation or refrigerate immediately. CAUTION: Longer time capped at room temperature could result in carbon dioxide accumulation and even explosion of the contents.
Repeat batches using continuous brew technique: To minimize handling the SCOBY and reduce introduction of contaminants, it is better to leave the SCOBY and starter liquid in the vessel and not wash the vessel between uses, but only if it becomes built up with yeast. Gently pour in new sweetened, cooled tea along the inside of the jar to limit disturbing the SCOBY. SCOBY growth can be peeled and shared with others or stored for several weeks in a similar cloth covered vessel, covered by kombucha.


